|
The Ken Burns Assistant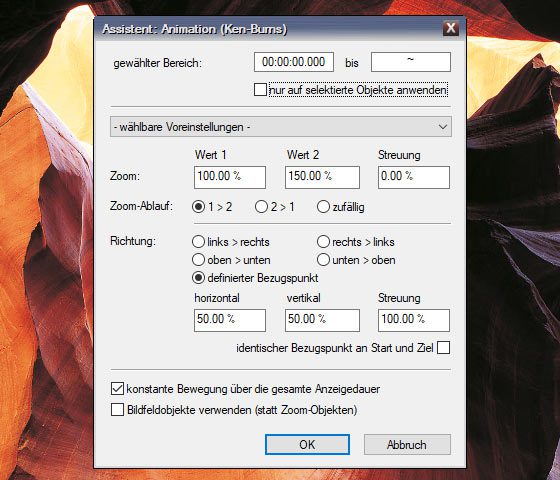
The new Ken Burns assistant in m.objects offers you a wide range of options to animate image sequences or individual images in different ways. All you have to do is mark the desired frames on the timeline and select a preset in the wizard. Each of these presets generates a different type of movement, from horizontal or vertical panning to dynamic zoom effects with random values. Basically, all you have to do is click OK and m.objects will do all the rest of the work for you. But you are of course used to making individual settings in m.objects at any time. And the assistant also makes this very easy for you. This means you can determine the zoom factor with which m.objects should zoom into an image, the direction in which movements should take place, or set the starting or end point of a zoom move. You enter all of these entries directly in the wizard form, so you don’t need to change individual dynamics objects on the timeline. If you want, you can generate complex animations completely freely and according to your own ideas, using the presets of the new Ken Burns assistant as a basis. This saves you a lot of work, especially when it comes to animating longer sequences of images. A possible practical example: You have a sequence of images with short pause times and want to quickly zoom into the following image with each image change. So you mark the images and call up the Ken Burns assistant using the key combination [Alt] [6]. Here you select the dynamic zoom-in preset. You can simply leave the specified values and confirm them or enter individual values, for example for the zoom factor or the direction of movement. And that’s just one of many scenarios that are possible with the new assistant. In this way, you can add spice to your multivision with targeted effects and ensure excitement and attention among your audience. Time-stretching for video sound in slow motion/fast motionfrom m.objects liveVideo clips that are accelerated or slowed down using the Speed/Pitch tool can now play back the original sound, if any, at the corresponding speed without changing the pitch. This is often important when audible and visible events in a video are clearly related and therefore have to remain synchronous, since a sound slowed down or sped up in the classic way would be reproduced with a corresponding frequency shift (lower or higher) and would therefore sound unnatural. This even works with dynamic speed control. Adjust the video section directly in the light curveBy dragging with the right mouse button while holding down the Ctrl key, you can easily move the section of a video within the light curve. In this way, you can easily adjust the start of a video sequence, for example, without cutting the video and manually moving the light curve. This works the same way with the sound from the video if it is separately on an audio track. The image and sound of the video are of course linked to one another and are moved together. Color Grading with m.objects X-2023from m.objects live
Color grading, or in simple terms color correction, is a crucial step in editing and preparing images and videos for multivision. In m.objects you have found the tool for image and video processing for many versions. With m.objects X-2023, this tool receives an important update with powerful new functions. Indicator for clipping When you make changes with the tool, m.objects now warns in the canvas with flashing hatchings when clipping occurs and shows where this occurs. In this way, you specifically avoid lights or shadows appearing in the image or video without drawing. These alerts can be turned on and off as needed. White balance with the pipette To easily perform a white balance, click on the color selector box. The pipette is now immediately available for targeted color absorption into the canvas. Even after you click on the canvas, the eyedropper remains active so that you can change or correct the selection of the neutral point for the white balance. The form now also has the option to enter a color value as an HTML value. This is particularly interesting for publications on the Internet. Before/after view and comparison with the original 
Miniplayers in audio forms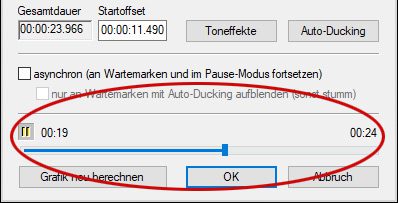 At the bottom of the form you can see the miniplayer, which you can start by simply clicking on the arrow symbol. If you now make changes to the volume, for example, you will hear them directly and do not have to confirm and start playback in the timeline. The miniplayer will then run until you stop it again. Particularly practical: If you close the form while the miniplayer is in play mode, it will also start playing the sound in the next form you open that has a miniplayer. This makes it very easy to work with and on the sound of a multivision. TimeStretcher for audiofrom m.objects live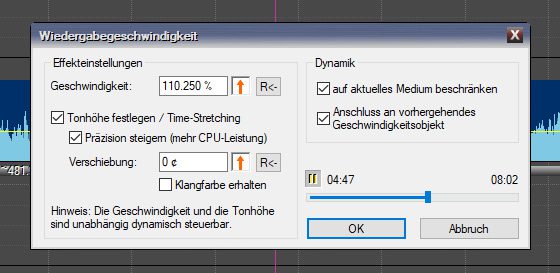 This is what makes the use of the speed object useful in the first place, especially in connection with spoken text or vocal passages. On the other hand, you also have the option of influencing the pitch while keeping the playback speed unchanged and, if desired, preserving the timbre. These new functions open up completely new possibilities for you to creatively edit the sound of your m.objects productions. Move the audio section with the mouseIn order to easily move the content of an audio clip that has already been created and adjusted on the timeline, you can hold down the [Ctrl] key and drag the dynamic display with the right mouse button pressed, just as with video clips. This change applies to all clips selected at the same time, including a video clip that may have been selected (this is automatically the case with dubbed/grouped material), so that synchronization is maintained. Auto-Ducking You do not need to make any manual adjustments to the tone curves for this function. In the form for auto-ducking you will already find useful presets, which you can of course also adapt individually. m.objects gives you the option to set the length of the lead and fade and the fade-in and fade-out for the ducking passage, and of course the strength of the sound attenuation. Auto-ducking makes it particularly convenient to use asynchronous sound at waiting markers (available from the m.objects live expansion level), which continues to run in the background. If auto-ducking is active, it automatically ensures the desired volume reduction without any manual input being necessary. 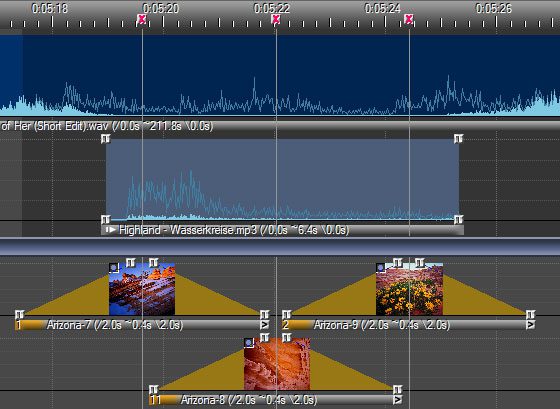
Input level control for sound recordingsIn the external recording form there is now a slider to the right of the control instrument that can be used to control the recording level of the source that has just been recorded. If the achieved level still appears to be too low even at the highest setting of the controller (the display should clearly swing into the yellow area), you should either amplify the source or try using the Input Channel/Mixer switch Increase the gain of the input used. Only if none of this is effective should the recording still be carried out and then amplified in m.objects using the attenuation/amplification control of the audio sample.
Fonts in file management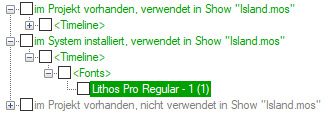 Open the properties window by double-clicking on a light or tone curveDouble-clicking in a light or tone curve now takes you directly to the properties window of the respective object. This makes this application even more intuitive. 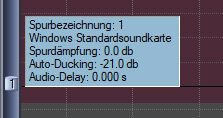 Show info window for image and audio tracksIf you drag the mouse cursor on the left side of the track name of an image or sound track, m.objects will now automatically display an information window. In addition to the track name, you will find further information here, such as the currently active sound card, sound attenuation or the use of auto-ducking. Scrolling in image and audio tracks
If you work with a larger number of image and audio tracks, the new m.objects version makes inserting new media even easier. For example, if you want to insert an image into an image track that is not currently in the visible area of the work surface, simply drag the new image to the top or bottom edge of the screen. m.objects will now automatically scroll up or down, and you can conveniently place the image where you want it. If you have saved a show accordingly, m.objects will automatically scroll to the last displayed position after reopening this show. In this way, the program visualizes that there are additional tracks outside the currently visible area. Automatic adjustment of timeline lengthWhile the default duration of an m.objects show was previously set to two hours, which you could of course change if necessary, the new version automatically adapts the length of the timeline to the content. At the end of the timeline, m.objects always adds a space equal to the length of the visible timeline area. If you now insert new content here, the new version will extend the timeline accordingly. Manual adjustments are no longer necessary. 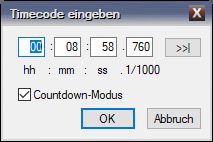 New countdown modeThere is now a new countdown mode in the synchronization status window, which shows the time position of the locator. During playback, this shows the remaining time until the last object on the timeline. Move curve handlesThe handles of a light or tone curve can now be moved horizontally as desired without affecting their vertical position. This way you avoid unwanted fades in a light curve or fades in the tone. You can then move the handles up and down by holding down the [Alt] key. |
Intelligent media insertion and deletion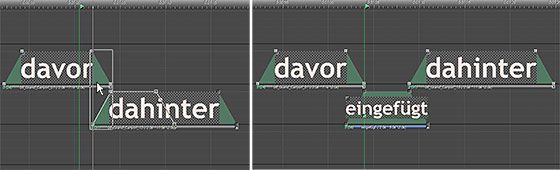
m.objects X-2022 offers considerable simplifications in the creative design of your shows. If you want to add new media to an existing show or delete media from an image sequence, m.objects X-2022 now makes your work much easier. To do this, you drag one or more images, videos or texts to the desired insertion point in the timeline, and m.objects creates the necessary space to place this media there and to align the timing with the media already there. This allows additional content to be seamlessly added simply by dragging and dropping without having to manually create the required free space. m.objects automatically adapts the fade-in and fade-out duration to the existing sequence, and if a changed track assignment of the following media is necessary, as many as necessary are rearranged. It doesn’t matter whether you drag content from the lightbox or Explorer into the timeline, copy and paste it from the clipboard, or use macros you have created yourself. You can also mark and delete images, videos and text on the timeline, and m.objects will automatically close the resulting gap. If necessary, m.objects moves subsequent objects to adjacent tracks. Of course you can work completely manually as usual. So the automatic insertion will only be active if you drag content exactly on an image transition. In addition, intelligent insertion and deletion can be switched on and off in the program settings or temporarily suppressed by pressing the shift key. Track assignment of newly inserted media
A simplified assignment of media newly imported into the timeline now ensures an alternating distribution on 2 tracks. This means that m.objects, for example, no longer inserts new images on all available image tracks, but specifically on two adjacent image tracks. This also eliminates the need to mute individual tracks, for example for texts and titles. If required, this new function can also be deactivated in the program settings or switched on a case-by-case basis by pressing the Alt key. Stabilization of videosfrom m.objects live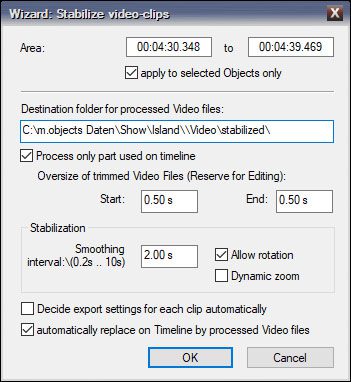 The smoothing of the movements can be set in the form of a time window between 0.2 and 10 seconds. In addition, the content can optionally be rotated to compensate for accidental tilting of the camera. With a – also optional – dynamic zoom, the necessary zoom in the video is slowly reduced where the recording is less blurred. If the option Decide export settings for each clip automatically is selected, the result of the stabilization will be encoded and written with parameters such as (codec, bitrate, etc.) that are identical to the source video. If the option is deactivated, the form known from the H.264/H.265 video export appears, which allows certain changes such as container type, compression and bit rate, and all selected video clips are written with these settings. Important for the new video stabilization: If a video is cut on the m.objects timeline, m.objects only stabilizes the part of the video used on the timeline. The video is also trimmed to the required length, a function that m.objects carries out without re-rendering the video and thus without any loss of quality. You can also deselect this option if required, so that m.objects then stabilizes the entire video file, regardless of whether it has already been cut on the timeline. Of course, m.objects also works non-destructively in this function, so the original videos remain untouched. Real-time post-processingfrom m.objects live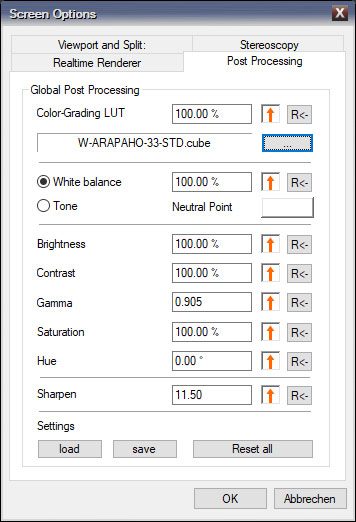 There is also a global adjustment of the white balance or the tone, which can be particularly helpful for compensating for a color cast – for example when using a projector whose color display you want to correct. This can be done with just a few mouse clicks and – unlike before – without any recalculation of content, so that the display can be adapted to unfavorable ambient light conditions at lightning speed or the color display can be corrected on site immediately before the start of the presentation. You can also select a Lookup Table (LUT) here in order to set up a specific color look for the presentation. This type of color grading has been mastered by m.objects for several versions. With the new option in the canvas settings, a LUT can now be set for the entire presentation and at the same time combined with correction LUTs in the settings of individual videos. All settings made here can also be saved and reloaded when needed, whether in another presentation to which you want to apply the same changes, or because you regularly use certain output devices whose color settings you want to correct. New and improved editing features
m.objects X-2022 also offers decisive innovations when it comes to video editing: You simply position the locator at the point in a video where you want to cut it and then carry out the video editing using a key combination. If the video is dubbed, i.e. the soundtrack is on a separate audio track, the audio is also cut at this point and optionally grouped with the respective video handles. As a reminder: With the quick preview while holding down the Shift key, m.objects offers an exceptionally practical function for locating exactly the desired frame of a video. Alternatively, you can navigate through the video frame by frame using the arrow keys (cursor keys). Thanks to the new key combination, the cut is now even faster and completely precise, even without stretching the timeline. But that’s not all. As before, you can cut out a passage of the video with two cuts, for example to delete a slip of the tongue or less important video content. The gap that occurs after deleting is now automatically closed, both in the video track and, if the video has just been dubbed, in the soundtrack. This innovation makes video editing much more convenient and also facilitates the exact editing of videos. And as with inserting and deleting media, the same applies here: the previous way of working with video and audio editing via the context menu and manual closing of the gaps is still possible, so that you can also proceed with the video editing as before if necessary. Timing adjustment wizard with expert mode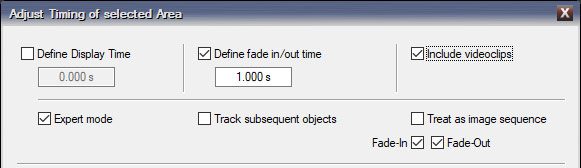 Quick selection of objects of the same typeAs you work on a multivision, you tend to try different values and settings in objects and dynamics tools. In animations in particular, it is often necessary to only select objects of a certain type in the timeline. Therefore, m.objects now offers the new option of not only selecting specific areas on the timeline, but also specific types of objects. An example of this: If you do a left/right click in the timeline, you select all objects that are to the right of the mouse pointer. In the new version X-2022, if you instead perform such a left/right click on a zoom object while holding down the alt key, m.objects will only select zoom objects that are to the right of the mouse pointer. Of course, this works for all types of objects and also with the selection via the context menu or when selecting an area with the lasso. Configurable whereabouts of deleted mediaUntil now, m.objects always put images, videos, texts and audio clips back in the light desk or in the audio pool if you deleted them from the timeline. In the new Timeline Editor and Pool tab in the program settings, you can now optionally deactivate these options – separately for the individual media types. Image blending for imported objects can be set in advance Important: The settings made here relate exclusively to media that you then insert into the image tracks. Existing media are not affected. New status display during video importThe first import of video files now takes place in two stages: In the first step, m.objects signals the analysis of the new videos. Only after the analysis has been completed is the content placed with a mouse click in the second step, i.e. only when m.objects has the exact information about the effective playing time of the video clips. Internal optimizations and improvementsOver 120 other improvements, optimizations and bug fixes have been incorporated into the development of m.objects X-2022 to further optimize performance, stability and the user experience when working with the program. |
m.objects X for Windows and macOS
m.objects X is the first version of the software that can be used both under Windows and directly under macOS. In the previous versions, the installation of an additional partition with Bootcamp or the installation of a virtual machine was required for use on Apple computers. With m.objects X, this detour has become superfluous. This means that production and presentation in the usual m.objects quality is now possible directly on both systems. X stands for ‘cross platform’. On the one hand, this means that m.objects productions are fully compatible between Windows and Apple computers. You can edit an m.objects show that you created on a Windows computer without any conversion on a Mac and vice versa. On the other hand, every current m.objects license is suitable for use under both Windows and macOS. So you don’t need a special license for either platform. In addition, future developments of the software will be carried out simultaneously for Windows and macOS. Activation of m.objects X
Up to version 9.5, the m.objects licenses live, creative and ultimate as well as m.objects pro were always activated with a USB dongle. When starting the program, it must be connected to the computer. With m.objects X there is now a new, additional form of activation for all licenses using an activation code, i.e. without a dongle. With such an activation code, activation is possible on up to two computers. Please note the differences between activation under macOS and Windows described below. basic licenses are activated without a dongle like before m.objects X, so they are not affected by these differences. Activation on macOS with activation code For use under macOS, m.objects licenses are always activated with an activation code. So if you want to use an existing m.objects license (live, creative, ultimate or pro) under macOS or under Windows and macOS, you exchange the existing dongle for an activation code. Activation on Windows with dongle or activation code If you only use m.objects under Windows, you have the choice of activating your license with a dongle or with an activation code instead. If you would like to continue using an existing dongle, the type of activation will not change. Otherwise, there is also the option here of exchanging the existing dongle for an activation code. New licensing optionsIn addition to the proven model of permanent licenses, it is now also possible to rent an m.objects license for a limited period of time. This can be particularly interesting if m.objects is to be used for a specific project or a customer order. You have the choice between different rental periods. You can choose between one, three and six month rental periods. If desired, such a rental license can then be converted into a permanent m.objects license. A subscription model – as known from other photo applications – is not planned for m.objects.New function in the object reflectionfrom m.objects live Photo: WIMPRO, Cyriakus Wimmer
The well-known dynamic object Reflection offers you interesting possibilities for creative effects. New in Version X is a gradient function that you can use to fade the mirrored representation of an object into transparency. The reflection becomes weaker and weaker towards the outside, i.e. with increasing distance to the reflected object. This allows even more realistic effects to be achieved than before. The effect of the gradient can be individually adjusted. To activate the function, check the Transparency gradient option in the properties window of the reflection object. To the right you can set the extent of the gradient: the higher this value, the larger the visible area of the reflection, and the less effective the gradient will be. 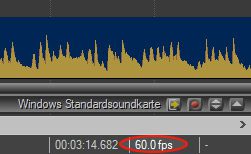 Display of the frame rate in the status barAt the bottom of the m.objects workspace you will find the status bar. If the status bar is not visible, activate it via the View menu. As soon as m.objects is in pause or play mode, you will see the new display refresh rate in fps (frames per second) on the right-hand side. This allows you to check whether your system is playing a show at the desired constant frame rate. Up to now, this display was only possible directly on the screen itself and thereby generated a certain system load. The new form of this status display, on the other hand, does not load the system during playback.Navigation with the arrow keysThe arrow keys [→] and [←] on the keyboard can also be used in connection with the [Ctrl] key under Windows or [cmd] under macOS in editing mode (stop mode) to jump to the next or previous image.Paste macros and clipboard contentWhen you paste macros or previously copied content from the clipboard into a show, the track-related hierarchy of objects is now preserved. For example, if you insert a macro that contains images on several tracks with overlapping content, its function and thus its visual effect are retained in any case. Of course, this arrangement can be changed individually later.Moving objects horizontallyIf you move several objects horizontally on the tracks at the same time while holding down the [Shift] key, the track-related hierarchy of the objects among themselves is retained. In this way you avoid an unwanted vertical shifting of the objects between the tracks. |
Create individual window layouts and call them up at any time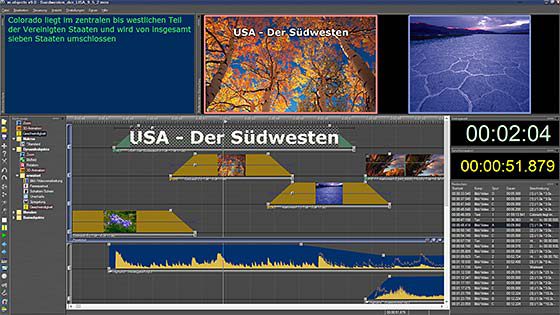
With the new m.objects version you save your individually set up window layouts of the m.objects user interface and access these personal settings at any time: when creating a new show or when working with existing presentations. Just two mouseclicks and you have the desired window design in front of you. In this way, you set up the work surface specifically according to your way of working and can also create different layouts for different purposes. Whether the toolbar is above the image and audio tracks or whether it is arranged vertically next to the tracks, whether the Tools window, which now also offers new options for displaying the tools, is arranged to the right or left, horizontally or vertically – you make the decision. For example, you can set up one layout specifically for presentation and additional ones for video or audio processing and call them up as required. Automatically show and hide dockable windows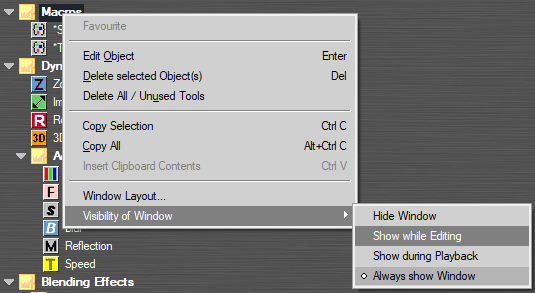
In this context, the new option to have all dockable windows such as Tools window, Image Pool, Speaker Preview, Digital Audio – to name just a few – automatically shown or hidden in the editing and presentation mode is from particular importance. You decide whether a window is always shown, only while the show is being edited or only when it is being played back. This allows you to set up the window layout of your m.objects user interface in a way so that, for example, the Tools window is visible during Stop mode in which you are editing your presentation. However, as soon as you switch to Pause or Playback mode, the Tools window is hidden and the Speaker Preview, Comments window or any other window is displayed in the according place. This saves space and makes the interface even clearer, but above all, you always have exactly those controls and windows in front of you that you need in the respective situation. These properties can of course also be saved in the individual window layout. New functions in the Tools window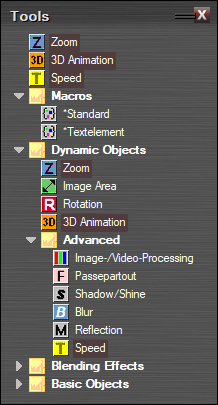 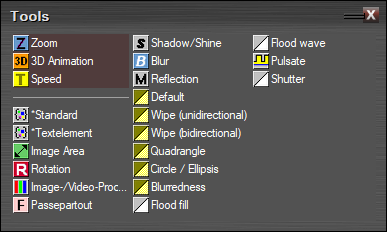 For quick access to frequently used tools, you also have the option of setting up favorites in both display forms. These then appear at the top of the tree structure or at the beginning of the list and can be used more quickly. Speaker Preview redefined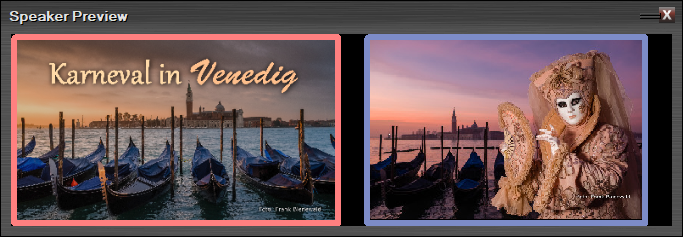
An important tool for the presentation is the Speaker Preview, which shows the current and the subsequent image of the presentation on the programs work surface, invisible to the audience. But thats not all that the Speaker Preview has to offer with the new update. The new Speaker Preview goes far beyond that and offers you even more display options: The new option to display the live image, which can also be seen on the screen here, is particularly interesting. This way you have the exact presentation image in view without having to turn away from the audience. Optionally, you can also combine the live image with the subsequent image on the timeline in order to have the further course of the presentation in front of you as well.  Inserting comments made easy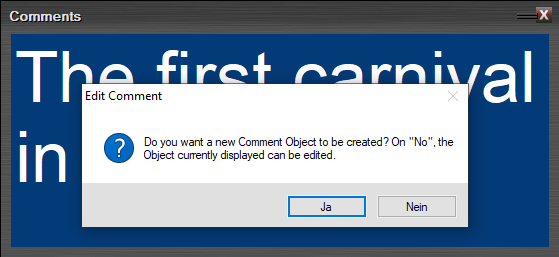
Prompter texts, also called comments in m.objects, are shown – like the Speaker Preview – exclusively in the program interface and are therefore not visible to the audience. For example, you can show historically relevant data on the lecture as a reminder or important information for your lecture. The new m.objects version makes handling the prompter texts a lot easier. If, for example, you have opened a Comments window, you only need to click in this window at the relevant point in your presentation, and m.objects inserts a new Comment object and – if it does not already exist – even a Comments track. So all you have to do is write your comment. This enables intuitive work and saves many mouse clicks for setting up the component.  Other helpful innovations for the live presentation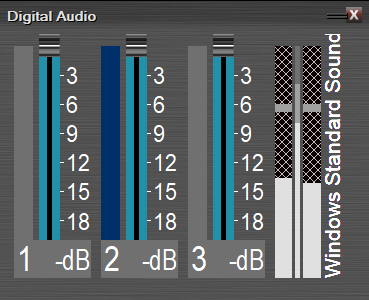 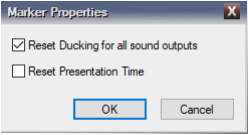 You can now also reset the Presentation Time with a Time Marker. This is particularly useful if you loop an opening for a while before the start of the actual presentation. The main lecture starts after the opening loop, so this should also be the starting point for the Presentation Time. Extended possibilities of the presentation files (EXE Files)Exporting a presentation as an EXE file gives you the option of outputting your presentation without m.objects being installed – for example on a third-party PC – in absolutely the same quality as from the timeline. EXE files are therefore the preferred insurance against technical problems on their own computer by many speakers. EXE files are also often used in competitions, which is why m.objects has supported this option for a long time. Version 9.5 extends the presentation files by two important functions: On the one hand, asynchronous audio is now also supported – in the same way as you are used to from the presentation in the program. The use of asynchronous audio in EXE files is now possible both with Wait Markers, where the asynchronous audio runs in a loop if necessary, and for jumps with Index/Jump Markers. On the other hand, Ducking in EXE files is also supported with the new version. Presentation files now offer even more flexibility than before. Title generator 2.0 While texts were previously limited to a certain design in terms of formatting, the new Titeleditor allows any text passages to be formatted completely unattached: You can now select the Font Family, Color and Style for individual words, across words and even for individual letters and combine them as you wish. The option “Justified” for the Alignment of texts is also new. To insert different formats and text colors, simply mark the desired text part and select the appropriate option or color. This results in completely new design options with the Titeleditor of m.objects version 9.5. But that’s not all. The new m.objects version makes it a simple matter to create texts of any length and number of lines in a predefinable format and – where required – in exactly the same size. With the new option Define Line Height you can give your texts a freely selectable font size. This has the critical advantage that the texts always retain their font size even if the number of lines changes. You can also transfer the selected line height to other texts so that, for example, in an animated title credits, each individual text block appears in the same size.  Working with text in m.objects is much easier and more diverse with the new version. It is important to note that texts, as usual, are treated in the same way as images, so they can be freely adjusted and animated with all m.objects tools. Further novelties in version 9.5In addition to the new features described, m.objects v9.5 offers numerous other additions and optimizations. This includes, for example, the creation of the video preview. m.objects now uses hardware acceleration for suitable graphics hardware, which significantly speeds up the process. In addition, the video preview is created in the background, so that you can continue working on your presentation during this process. |
Novelties on the timeline and in the Tools window Video clips on the timeline can now be set so that only the first and last frame of the respective visible section are shown in the light curve. In this mode, also, the frame at the exact position of the cursor can be displayed without delay by holding down the Shift key. You will also notice changes in the Tools window in the new m.objects version. This central constituent of the software now offers a clear hierarchical structure of the tools available for the respective component. Macros, Dynamic Objects and Media Files are now listed under separate branches within one tree structure, which you can open and close individually. In addition, we have also added Blending Effects and Sound Processing to the Tools window, which can thus be drawn directly onto the light curves or audio tracks. The path via forms and context menus is therefore no longer necessary. When pulling the tools, the respective symbol is also always recognizable on the cursor. These innovations make working with the Tools window much more convenient. A tip in this context: The new tree structure can be used particularly efficiently if you dock the Tools window to the left of the tracks in the work surface. Color grading Color grading, i.e. color processing with LUTs, provides a high degree of creative and artistic possibilities for post-processing your multivisions, because colors can create specific moods and specifically enhance the emotional effects of images. In addition, m.objects v9.0 also supports the use of correction LUTs, which are used for professional film cameras. The lookup tables are applied in the Dynamic object for Image-Processing (available from m.objects live) or alternatively in the editing window for videos or pictures. Creative LUTs can also be applied to complete presentations with just a few mouseclicks. This creates an individual look that supports the expressiveness and effect of your pictures and videos. White Balance in Image-Processingfrom m.objects live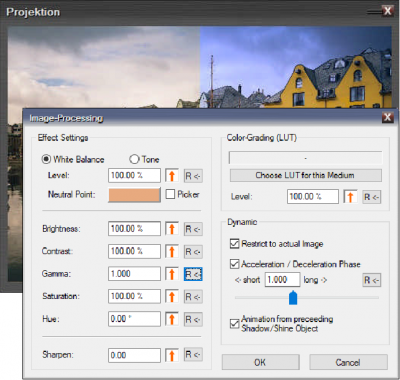 Video export in standard H.265 and extremely fast with hardware acceleration m.objects now uses hardware encoding for all video exports in the formats H.264 and H.265, which accelerates the computing process many times over with a suitable graphics card. The export of an m.objects show as a video – also in high resolution – is much faster than before, depending on the graphics card up to ten times faster. There are also important innovations for users of stereoscopy: 3D presentations can now also be exported in the formats H.264 and H.265 as well as in an image sequence. Video trimming: frame-accurate and without any loss of quality
In most cases, videos are cut to a specific section using the established m.objects functions. Version 9.0 now offers the new option to trim the videos, i.e. to save them as a new file that only has the length actually required plus a selectable cutting reserve for later editing. This saves a significant amount of storage space. The crucial point here: The trimming is executed without further compression – i.e. without any loss of quality compared to the original and therefore also incredibly fast. Optionally, the video files on the timeline are exchanged immediately for the trimmed version – frame-accurate, of course. This procedure works with almost any encoded video files. The new screenshot function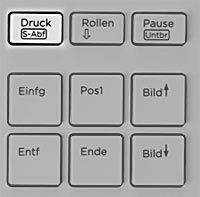 Exporting selected objects and sequences as videos The new function is particularly well suited, for example, for converting complex animations, time-lapse or extremely high-resolution video material into a new, separate file that affects the performance of the computer to a lesser extent. The corresponding part of the show can simply be replaced by the newly created video. Using the arrow keys to navigate on the timelineThe arrow keys (right / left) of the keyboard can be used for navigation on the m.objects timeline in m.objects v9.0. In video sequences you navigate back and forth frame by frame, outside of video sequences the locator moves 20 ms to the right or left. If you keep the [Ctrl] key pressed, the current selection is moved to the subsequent or preceding object of the same track – as usual. Adjusting objects when the speed changesThe Speed object allows you to modify the speed of videos and audio samples. However, this also means that the respective video or sample requires a longer or shorter Projection time than before, which had to be adjusted manually thus far. With the new version, m.objects optionally carries out this step automatically. Exporting comments as a text fileUsers that work with the Comments feature can now also export the comments from a show as a text file. This can be helpful to create a script and print it out, for example. Optionally hidden Jurying ModeIn the form for the Jurying Mode, you can now choose whether the ratings of the individual judges during the evaluation run are shown on the Screen openly or are carried out hidden. If the ratings are hidden, the symbols displayed for each judge only reveal whether the rating has already been submitted. This is indicated by the gray question mark symbol switching its color to green. |
The novelties of m.objects version 8.1 |
Dynamics Processor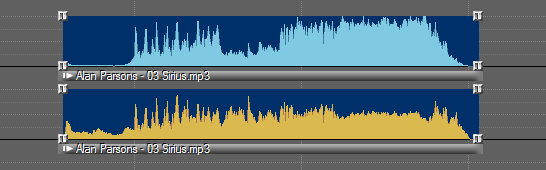
The Dynamics Processor makes it possible to compensate for deviations in loudness (i.e. the perceived volume). Many producers of multivision know the problem that music pieces, spoken texts and original sounds are perceived as divergently loud. Complex and time-consuming correction work is usually the result. The new Dynamics Processor provides a very effective remedy here by reducing significant deviations between quiet and loud passages, but without leveling out short-term developments in dynamics. The specific characteristics of particularly sophisticated music are retained, however, texts spoken divergently loudly or pieces of music from different sources that differ significantly in dynamics are effectively coordinated. The new Dynamics Processor works as a global tool, thus affecting all audio samples in a production. It is available in all expansion stages. From m.objects live there is also the possibility to apply the Dynamics Processor individually to particular samples in the Sound Effects options (see below). New Sound Effectsfrom m.objects liveWith new sound effects, m.objects v8.1 extends the creative applications of the recently re-arranged Audio Service. The sound effects can be configured individually for each audio sample. 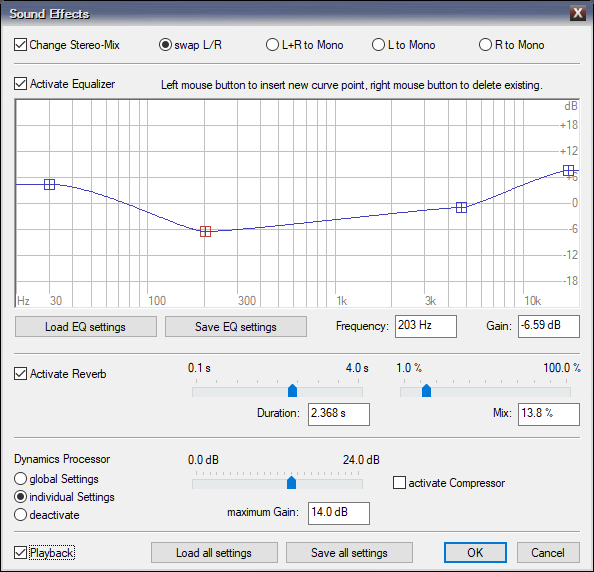
Change Stereo-Mix With this option, the left and right audio output can be swapped (swap L/R) or both channels can be output simultaneously as mono sound (L+R to Mono). In addition, it is also possible to output the single audio signal from the left or right channel on both outputs (L to Mono or R to Mono). This option is used, for example, if a recording could only be made by one channel due to a technical problem or if one of the two channels contains interference. Equalizer With the very flexibly adjustable Equalizer, heights, mids and lows of the audio samples can be configured individually. This way, dull-sounding recordings are given more brilliance while droning basses or disturbing, dominant mids in the music are attenuated. The adjustments are made in a diagram using handles. If required, any number of additional handles can be added to the existing ones to make differentiated changes. Reverb effect With the Reverb effect, audio samples are subsequently given an acoustic environment. This is useful, for example, for comments or mono recordings in order to give them a spatial character. Dynamics Processor As an individual sound effect, the new Dynamics Processor can also be applied to particular audio samples. This way, the settings of the global Dynamics Processor can be overwritten at specific points with individual values or deactivated entirely. Animation of travel routes and cut-out shapes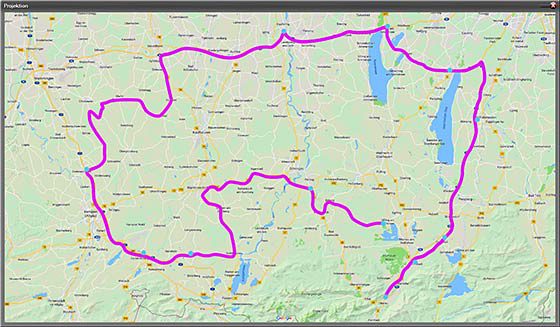
An animated travel route gives the audience an effective impression of the course of a trip. Therefore, this stylistic device is often used in Multivisions. Whereas complex constructions with masks were previously required to create an animated travel route, m.objects now offers tools for an equally simple as effective implementation with the new QuickBlending effects Flood fill and Flood wave. The two new effects reproduce the cut-out lines accurately. With a single mouseclick, the user determines the starting point of the animation, the rest is done automatically by the program. It is completely irrelevant for this function how differentiated the course of the travel route is. The defining parameters can of course also be set individually here, and the speed of the animation is simply regulated by the duration of the fade-in or fade-out of the image. The Flood fill option draws a line from the starting point to the end, while the Flood wave option displays only a section of the line at a time that moves from the starting point to the end point. With these two new QuickBlending tools not only travel routes can be traced, but also other optional shapes, so that there are plenty of creative design options.  Ducking indicator for live presentationsfrom m.objects liveFor spontaneous comments during an ongoing presentation, manual ducking offers the option of lowering the volume at the touch of a button on a remote control or the keyboard and then increasing it back to the normal level in the same way. In order to give the speaker an overview of the current state of ducking, m.objects offers a new indicator that can be activated in the Screen Options. While the ducking function is activated, an unobtrusive arrow symbol will become visible in a freely selectable corner of the Screen with an adjustable intensity. Optimized video handling on the timeline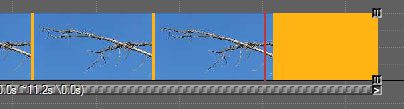 Naming tracks individually Quick overview of object properties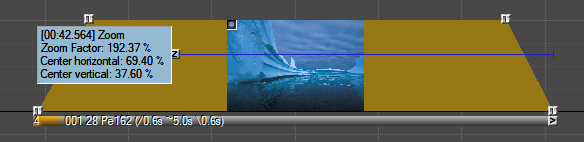
The most important parameters of individual objects on the timeline can now be displayed directly without having to open the respective properties window. To do this, simply move the mouse pointer over the corresponding object while holding down the Shift key, whereupon the adjustable values are shown next to the cursor. For a Zoom object, for example, the Zoom Factor/Level and the position of the Zoom Center are displayed. |